Turtle Sense nest site installation instructions
Introduction
These step-by-step instructions are meant for someone who has never installed a sensor or communication tower into a turtle nest. The sensors and communication heads/towers are the two main components of this remote monitoring system. These systems are capable of detecting nest hatching activity before any external signs of hatching (I.e. depression or emergence) are evident.
Installing a Sensor
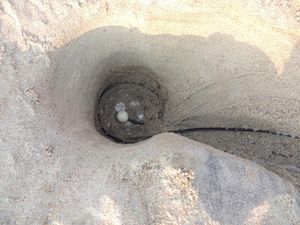
At Cape Hatteras National Seashore, turtle patrols are conducted daily from May 1-Sept 15, or 2 weeks after the last sea turtle nest or crawl is found. Once a nest has been located, the biological technicians conducting the patrols determine whether or not the nest needs to be relocated. According to the NCWRC guidelines, a turtle nest should be allowed to incubate at its original location if there is any reasonable likelihood of survival and relocation should only be considered as a last resort in terms of nest management. The ping-pong ball shaped sensor should be placed on the top of and in the middle of the nest. Usually the sensor can replace the egg that is removed for the DNA study. The cable should be coiled one time around the inside of the top of the nest cavity (Fig. 1).
Figure 1. Sensor and cable placement on top of turtle eggs.
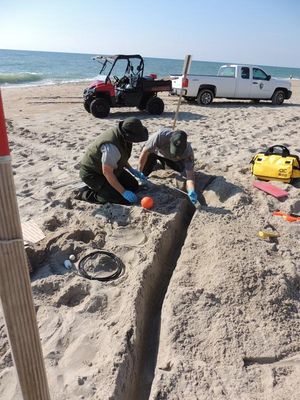
Next, dig a trench for the cable and the terminal end of the sensor. The trench should be deep enough so that it will not be uncovered by the wind and/or storm events (Figure 2).
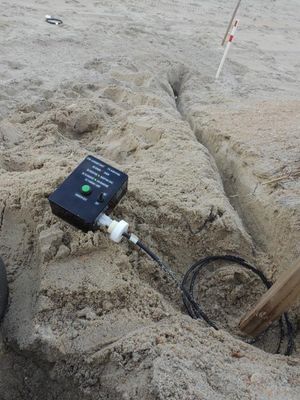
Figure 2. Trench leading from turtle nest to sign post for cable. Prior to burying the sensor and cable, the sensor should be registered with the hand held device (Figure 3).
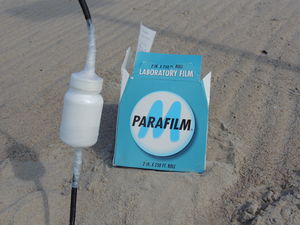
Figure 3. Testing and registering the sensor with the hand held device. The hand held device 1) determines if the sensor is functioning properly, 2) determines if there is adequate cell tower reception, and 3) registers the time and placement (i.e. GPS location) of the sensor. See YouTube video for detailed information on the hand held device and sensor registration (https://www.youtube.com/watch?v=4z2kcYOHgsw). Once the registration is completed, the terminal end of the sensor is protected with the provided pill bottle. The seam of the bottle is wrapped with Parafilm to prevent moisture from corroding the sensor terminal (Figure 4). Only after the registration is complete (and the sensor is registered) should the cable be covered with sand.
Figure 4. Parafilm is wrapped around the seam of the pill bottle to protect the terminal end of the sensor from corrosion.
To make it easier to remember where the terminal end of the cable is located, the cable should be buried and then wrapped around the back, RIGHT (if facing the dune) turtle sign (Fig. 5).
Constructing a Communication Tower
Because of the weight of the communication towers (i.e. cement bases) they will have to be built on site. Following is a list of supplies that are needed to build a tower (Fig. 6) :
- 3" PVC (pre-cut to desired length-10 ft.pipe cut into thirds.)-if not pre-cut you will need something to cut it with.
- 3.5 gal buckets
- Tub for mixing cement
- Quikcrete (60 lbs.)
- Shovel
- Level (optional)
- Masking tape (optional) – used for setting the PVC.
- Drill
- 2" hole saw.
- Sanding drum for drill (or a Dremel tool) to sand down the edges of the hole in the PVC. I use the hole as a handle when carrying it in the field.
Figure 6. Supplies needed for communication tower construction. After mixing the Quikcrete with water, pour it into the buckets. One 60 lb. bag of Quikcrete should be sufficient for two bases. Insert the pre-cut PVC into the cement, level the PVC and stabilize with masking tape (Fig. 7).
Figure 7. Leveling and stabilizing PVC with masking tape. After the cement has dried for 2-3 days, drill a 2” hole at the base of the tower. The hole will need to be large enough to be able to pass the terminal end of the sensor through the opening (Fig 8). It is also recommended that 4-6 small drainage holes be made just above the cement level in the bucket to prevent water accumulation.
Figure 7. Completed construction of the communication tower.
Installing a communication tower and communication head
Upon receipt of the communication heads, they should be attached to a sensor to insure that no damage occurred during shipping. Confirm with Nerds Without Borders that they are receiving data from this sensor/comm head. After approximately 50 days (or less) of incubation, locate the terminal end of the sensor that should be wrapped around the back, right sign of the closure. Uncoil the cable and dig a hole for the concrete tower base. The lip of the bucket should be buried just below the surface of the sand (Fig. 8).
Fig. 8. Communication tower and head for sensor data transmission.
Feed the terminal end of the sensor through the hole at the base of the tower to the top of the tower. Leave plenty of cable slack at the top of the tower so that it is possible to lay the communication head on the ground while it is attached to the sensor (Fig 9).
Fig. 9. Attaching the terminal end of the sensor to the communication head.
If this is a one person install, having the slack will make it easier to wrap the pill bottle (housing the connection) with Parafilm after connecting the two cables. Both the seam (where cap connects to the bottle) and the base of the bottle (where the coomunication head cable enters the bottle) should be wrapped with Parafilm. Once the communication head has been connected to the sensor, the communication head can be attached to the communication tower by tightening the set screw at the base of the communication head. To prevent rust issues with the set screw, cover it with a piece of white (if available) electrician’s tape. Confirm the install of the communication head with Nerds Without Borders. Rake out any tracks/depressions around the communication tower (Fig 10).
Fig. 10. Communication head/tower installed and transmitting data.
Removing the Sensor and Communication Tower
The nest should be excavated 72 hours after the first emergence of turtle hatchlings. Follow normal procedures for conducting an excavation. If more than 15 live hatchlings are encountered the nest, the nest should be gently re-covered with sand and the hatchlings allowed to emerge on their own. Note the exact time an excavation was started do that hatchling vs human movement of the sensor can be distinguished. If less than 15 live hatchlings are encountered during excavation, document the number of live hatchling encountered above, below, or level with the sensor (Fig. 11).
Fig. 11. Live hatchlings encountered above the sensor.
Note if the cable or sensor appeared to impede hatchling emergence in any way. Pull up the buried cable and follow it to the communication tower. Do NOT detach the sensor from the communication head for at least 6 hours after the excavation. This will allow the final data from the sensor to be sent and prevent the loss of this data. The communication head and sensor can be removed from the tower but the connection between the communication head and sensor should not be broken. If traveling with the communication head still installed on the communication tower, make sure the tower is fastened securely in the vehicle so that the communication head is not damaged during transport (Fig 12).
Fig. 12. Make sure towers with communication heads are fastened securely during transport to prevent damage.


